Practical Guide - Growth Tracker
 Show all articles on the knowledge base with the filter:
Tracking Growth
Show all articles on the knowledge base with the filter:
Tracking Growth
Reading Time: +/- 26 mins
Table of Contents:
0. General information
The Hylyght Growth Tracker is a method to effectively monitor growth and maturity in youth athletes. To learn more about why this is important, visit the e-learning section on our website. By using the Growth Tracker, sports organisations are empowered to make data-driven decisions concerning injury prevention, group management, and talent identification.
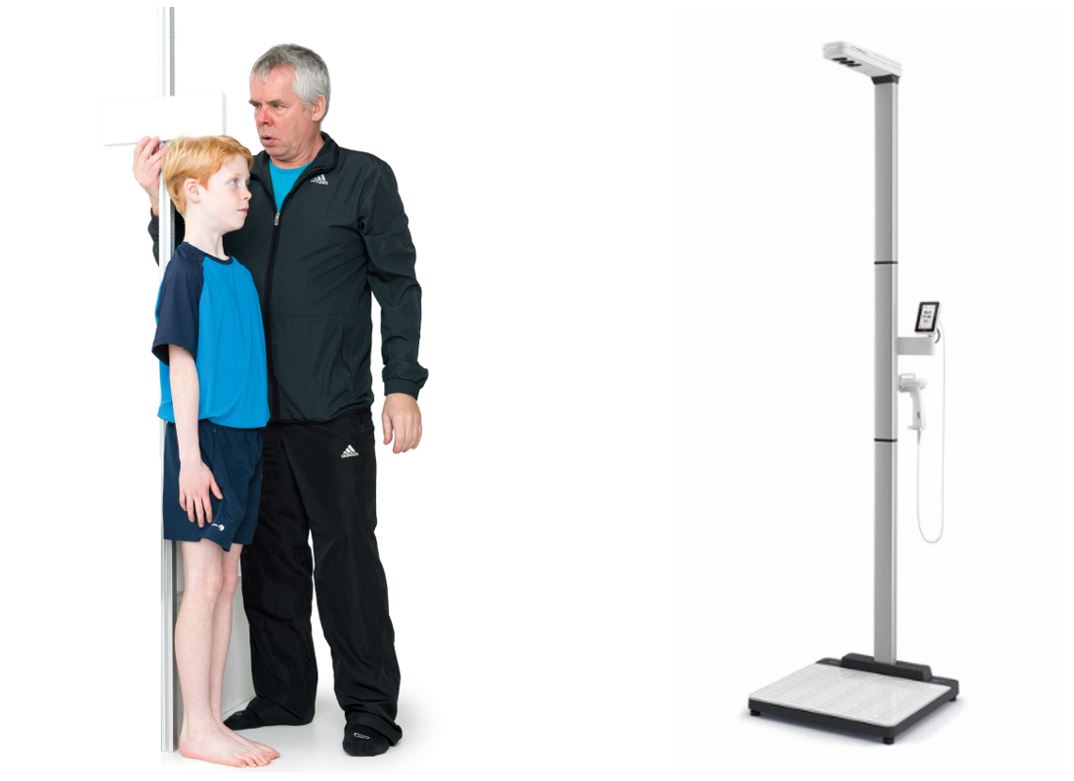
The data for the growth tracker can be collected in two ways:
- manual measurements using stadiometer and weight scale
- automated measurements using Seca287
The management of athletes, data, and results takes place on the Hylyght platform.
1. Introduction to the Hylyght Platform
1.1. Set up your account and log in

When you subscribe to the Hylyght Growth Tracker, your organisation will be added to the Hylyght platform. Instructions to log in for the first time will be sent to the e-mail address you gave up when subscribing. If you did not get the login yet, but you want to start testing soon, contact .
Log into the platform via app.hylyght.com, and use your temporary password to log in. You will be asked to create a new password immediately.
1.2. The main tabs in the platform

When using the Growth Tracker there are 4 main actions in the platform (in the black ribbon on the left): plan/manage sessions, add/manage athletes, view results, and view results of the Growth Tracker.
A Session in the Hylyght platform is a testing moment. A session could include one or multiple athletes, and could include various tests. For the Growth Tracker, sessions are only necessary when manually adding data (see section 3. Gather data). When you use automated data collection via the Seca287, you do not need to use the tab Sessions.
In the tab Athletes you can view, edit, and add athletes to the platform. You need to create an athlete before you can add data (see next session).
In the tab Results you can compare the test results from athletes within one group. This tab is not visible if you only use the Growth Tracker as results about growth and maturity are displayed in the tab Growth Tracker.
The tab Growth Tracker will show the results of the measurements per team. Here you can select the metrics you want to analyse, sort the athletes, and export pdf summaries for the coaches and/or athletes.
On the bottom left, you will also find a tab Help & Support. Use these if you have any questions for which you cannot find the answer in this guide. Finally, under Settings you can change the name of your organisation, add a logo, add users, and set two factor authentication.
1.3. Add extra users
To add more users to your organisation, go to Settings, Users, and click on + Add user. The moment you add this user, he/she will receive an email notification to login on the Hylyght platform. So make sure to inform these users before you add them.
We recommend that a club appoints only one or two people who have access to the platform.
2. Manage athletes
Before you can start testing your athletes, you need to add them to the Hylyght platform and organise them in groups. You can add athletes either manually or one by one, or import a list from an excel file.
2.1. Add a single athlete
To add a single athlete, go to Athletes(1), click on the athletes(2) tab, and on + Create athlete(3). Fill in the required information (marked with *) and save. Other information is optional. You will now see the athlete was added to the list.

2.2. Add a list of athletes
To import a list of athletes, click on the 3 dots (= meatballs(3)) next to + Create athlete and select Import athletes from a spreadsheet(4).

Download the Excel template, and fill in or copy-paste the information to this file. Do not change the columns of the file! If you are copy-pasting the information from another file, make sure all data is in the correct column and format (e.g. ‘Male’ or ‘Female’ in English only). Add groups to your athletes. We recommend make groups that indicate the season and the team. For example: S23-24 U13 Males. Add email addresses of athletes or parents as contact information if available (optional).
Hint: If your original Excel file has names and birth dates in a single cell, you can easily separate these into separate columns using the ‘Text to Columns’ function (in the tab ‘data’). Furthermore, if you have a list with gender in your own language, you can replace all of them by the English term using the ‘replace all’ functionality (ctrl + f and choose 'replace').

Upload the Excel-file, and review the imported information. When you refresh, the athletes will be added. If used, the new groups will also be created according to the Excel-file. (in this example ‘2B’ and ‘3A’) Note that you might need to wait a couple of minutes and/or reload the page before all athletes and groups are completely uploaded to the platform.
2.3. Organise athletes in groups
Analyses and reports are generated per group. We recommend to add each team as a group, and (optionally) to have one general group containing all athletes. To keep the overview after multiple seasons, add the season nr. to the group name (e.g. S23-24 U13 Males) If the athletes were added in bulk by uploading the Excel template, athletes should be assigned to a group already. If you want to see results of all athletes in multiple teams in one screen, you need to make a ‘general’ group which contains all athletes of this season.
To create a new group : go to ‘Athletes’ (1), click on ‘Groups’ (2), and select ‘Create group’ (3). Give your new group a name (e.g. S23-24 All athletes).

Add athletes to the group:
- Go to ‘Athletes’ (1) & Select the athlete(s) you want to add to a group (checkbox appears when mouse hovers over the blue square next to the athlete’s name), or ‘select all’ (2)
- Click on the ‘meatballs’ (3)
- Click on ‘Add selected athletes to a group’ (4) & Select the required group
- Check in ‘groups’ if the athletes are added to the corresponding group

Note: when you remove an athlete from a group, or remove a whole group, these athletes and their data will still be in the platform, just not connected to this group anymore. You can also move an athlete to another group.
3. Gather data
3.1. Test instructions
Measuring stature and weight seems easy, but needs to be done correctly to limit variability. Whether you measure manually using a stadiometer, or automatically using the Seca287, follow these guidelines:
Stature
- Always use the same equipment
- Measure on the same moment and under the same circumstances (e.g. before warm-up of a home game).
- Instructions: ‘place your heels together, make yourself tall, look straight ahead, and take a deep breath’
- Correct for head position if necessary (eyes and ears should be on the same line)
- Be sure that the athlete keeps heels on the floor at all time
Diurnal variation in stature is about 1% or even more. For this reason it is important to measure under the same circumstances as much as possible. Especially when measuring monthly, the diurnal variation might be larger than the actual growth of the athlete, leading to erroneous results and conclusions.
Weight Weight is used for two purposes. On the one hand it is used in the Khamis-Roche formula to estimate adult height. On the other hand, it can be used as a separate variable to monitor weight gain during/after peak height velocity.
- Always use the same certified weighing scale
- Be sure the scale is ‘zeroed’, and on a hard and level surface
- Ask athletes to wear only underwear, sports short and t-shirt
- Write down result to an accuracy of 0.1kg
weight can vary significantly if the athlete just ate or drank. For the growth tracker the effect of this variation on estimated adult height is negligible.
If an athlete is not comfortable with being weighed regularly, this could be done only once every year or even two year to recalculate the estimated adult height. Keep in mind that the latest (and therefore not updated) value for weight and weight velocity will still be shown in the results.
Test frequency Before you start testing, you should decide how often you will measure your athletes. To get good results, you should test at least 4x/year (quarterly), but also not more often than 12x/year (monthly). In the latter case, small measurement errors in height could already be extrapolated in large errors in growth velocity (expressed as growth per year). Furthermore, a youth athlete will not be in his/her growth spurt one month, and completely out of it a month later. So measuring height more frequently might provide interesting data for researchers, but will be of very little added value for the practitioners.
3.2. Add data manually using a stadiometer and weighing scale
When measuring manually, a test session should be created for each team that is tested. For athletes who are tested the first time a ‘Start’ session should be created, for follow-up measurements, a regular ‘growth tracker’ session can be used.
Data can be entered in the platform in two ways, either by using the platform itself or by using the ‘test app’. The test app is most convenient for during a testing session, while changing or adding data is easier using the platform.
3.2.1. Plan a Growth Tracker Session
For athletes that get measured for the first time, a ‘START growth tracker’ session should be created. This session collects not only the measures of height and weight, but also the height of both biological parents of the athlete. Height of father and mother are necessary for the Khamis-Roche method to estimate adult height.
Athletes who were measured already before, either in an earlies session or in last season, can immediately be measured with a normal ‘growth tracker – height & weight’ session.
To plan the START Growth Tracker session:

- Go to the ‘Sessions’ screen, and select ‘+ New Session’ You will get a pop-up in which you can add the details of the new test session. If you have the choice between ‘custom’ or ‘prevention’, click on ‘custom’ (this is only for clients who also use the rehab module in Hylyght)
- As ‘session name’, choose a clear name to recognise what and who was tested, for example '24-25 U13 Jan'.
- Indicate when the test will take place
- Choose the test set ‘START Growth Tracker’ test set
- Choose the ‘Hylyght – Generic benchmark
- Click ‘save’
Your session is now created. However, don’t forget to add athletes to this session before you start testing (see next section).
For every follow-up measurement, a new session needs to be planned. For these sessions, use the test set ‘Growth tracker – Height & Weight’. These can be set up in the same way as the ‘start growth tracker’ session, but just by choosing the different test set type.
3.2.2. Add athletes to a session
- Go to ‘Sessions’(1) and select the session for which you want to add athletes (2)
- If no athletes were added yet, or new athletes need to be added:
- Go to the tab ‘athletes’ (4), and click on the ‘meatballs’(4)
- Select ‘+ Add athletes’
- A pop-up appears showing in the first tab the groups that are available, and in a second tab all the athletes that are available
- Select group or athletes that you want to add to this session

Now your test session should be ready to start: A session has been created, and the athletes that need to be tested were added to this session.
3.2.3. Collect data via the test app
- In ‘Sessions’, select the session you want to start (1)
- On the right screen you will see ‘Start session’ or ‘Continue session’
- Clicking on ‘Start session’ (2) will open a new tab with the test app opened in your browser (See next section for more information on the test app).
- However, the test app is designed to be used on a smartphone instead of on a laptop. To send the test app to your phone (or to other test leaders who will be collecting the data), click on the little arrow next to ‘start session’ and select ‘copy URL’ (3). Copy the URL in the pop-up and send it to the test leaders, via WhatsApp, email, Messenger, or any other communication app that all test leaders use. Alternatively, make a QR-code of this URL to be scanned later.

Using the test app
The ‘Hylyght test app’ is designed to be used on a phone or tablet and allows multiple test leaders to simultaneously gather data. If one test leader is measuring height and another is testing weight, they can therefore use the same test app to simultaneously write down the results, which are then automatically saved on the online platform.
As the test app is also designed to be used for physical fitness tests, the test leaders can see the progress of the test session (which athletes were tested on which tests). A brief description of the test and a stopwatch is integrated for timed tests. Furthermore, the test app also allows only certain minimum or maximum values to avoid input errors.
Although it is called a ‘test app’ it runs on a browser and therefore does not require you to download an app or any software. It works on both iPhone and android phones (and on laptops and tablets), and works on most browsers (preferably use Firefox, Chrome, or Safari).
To share the test app with other test leaders, the coordinator needs to copy the url (see previous section) and send it to the test leaders. Opening this link will open the test app, which is unique for the session that has been made. The test leaders do not get access to the platform or any other data, only to the test app for this specific test session. The test leaders can see which tests have been completed by which athletes, but cannot see the results. They cannot delete any results, but they can overwrite older results if they administer the test again.

Opening the test app url will open a new page on your browser (see screenshots below). You can choose to view per athlete how many tests were already completed (1), or select the second tab ‘tests’ (2) to see per test how many athletes completed it already. In both tabs you can see the number of athletes/tests that have already been tested. These squares (3) remains blue as long as 0 athletes/tests have been completed, turns orange when some are completed, and will be green when all tests/athletes are finished. Note that this will be updated throughout the testing session. When one test leader finishes his/her test, other test leaders will see this in their test app too. Hint: while navigating in the test app, only use the arrows and buttons in the app. Avoid using the system buttons to ‘return’ (4). This will result in the app refreshing and will take much more time than using the in-app arrows/buttons.
When clicking on a name (e.g. Athlete B), you will see which tests this athlete already completed. When in the ‘tests’ tab, clicking on a test (e.g. Height) will show which athletes already completed this test.

When an athlete and a test is selected, the app will open a new tab for this measurement (1). The app will show name, gender, and age of the athlete (2), and a short explanation of the test protocol can be found below (3). Klicking ‘Start test’ will open a new screen in which the test value can be entered (4). For timed tests (not applicable for Growth Tracker), starting the test will immediately trigger a 3-2-1 countdown (5), and start the timer for this test. So make sure the athlete is ready before you click ‘Start test’ ! The timer will be specific for each test, so it will count down 30 seconds for knee push-ups, but only 15 seconds for jumping sideways. Note that you can ‘skip’ (6) the timer if necessary (e.g. the athlete did the test before and you only need to enter the score still).
When the test result is entered, click on the blue arrow (7). Click on ‘Save & close’ to save the measurement. This will close the measurement tab (1), and return to the start screen of the app. You will see that the measurement has been recorded as the number has increased for this participant/test, and if you check this measurement, a green V-icon will be shown.

Notes and remarks when using the test app
When you open a measurement session, it is possible to click on ‘session’ in the upper tab (1). This way you return to the start screen, but be aware that the tab with the measurement session is still open (2). When you or another test leader will try to open the same measurement session, a warning will appear that the athlete is already selected for this test (3). This is because as long as the measurement tab is open, the app sees this measurement as ‘in progress’. To close this measurement tab without entering a result, click on the ‘x’ (4). A warning will appear to indicate that you will close this test without saving the result.


In some cases it might be convenient to use multiple measurement tabs at once. For tests where multiple trials are necessary (e.g. eye-hand coordination), some participants prefer to take a short break between two trials. In this case, a second ‘tab’ (1) can be opened to test another athlete during the first athlete’s pause. Always check if all data was saved, and no tabs are open after completing the measurements.

On some phones it might be difficult to select the bottom name or test, as it appears to be ‘behind’ a system button. Use the sorting function (2) to move this test/name to the top of the screen.
3.2.4. Enter data via the platform
Instead of using the test app, you can also enter and change data directly in the online platform.
- Go to ‘session’(1) and select the session for which you want to add data(2)
- Click on ‘Athletes’(3), and select the athlete for which you want to add results(4)
- Go to ‘Data’(5), where you can see which tests have been completed
- Click on the ‘edit icon’(6)
- You can now enter the test results for this child
- Don’t forget to click ‘Save’ and ‘Finish’ before closing the screen or selecting another child !


3.3. Add automated data using the connected Seca287
Using the connected seca device removes the need to plan sessions. The athlete can identify him/herself using a personal QR-code, carry out the test him/herself, and the results will be automatically saved in the online platform.
Be sure that the athletes know the correct procedure to accurately and reliably carry out the measurement! Ideally, these test sessions are still supervised by somebody who knows the test instructions well (see 3.1. Test instructions).
3.3.1. Connect the Seca287 to the Hylyght platform
Before you can start testing, the Seca287 needs to be connected to the Hylyght platform. Contact for instructions on how to do this.
3.3.2. Generate QR codes
Athletes need to identify themselves on the Seca device by scanning their personal QR code. To generate these QR codes for your athletes:
Note: not all users can generate QR codes. If you do not have access to this function, contact
- Go to ‘Athletes’ and click on the group for which you want to generate QR-codes
- Select the athletes in this group for which you want to generate QR-codes (1), either by using ‘select all’, or by selecting them individually.
- Click on the ‘meatballs’(2), and select ‘Generate QR codes(3)
- A pop-up will appear with the individual QR-codes for each athlete
- To print and/or save these QR-codes, click on ‘print’ and choose either to print the codes, or to ‘save to PDF’.

3.3.3. Use the Seca287 to collect data
To collect data using the Seca287:
- Scan the personal QR-code to identify the right athlete
- Step on the Seca device and follow the instructions
- Look straight forward and take a deep breadth and hold it while the device scans your height.
- Your height and weight will appear on the screen, and the data will be sent to the platform
- Step off from the device. Move a bit further from the device if it does not return to the home screen (if it detects movement on/next to the plate it will try to restart the measurement)
- Scan the QR-code of the next athlete to continue testing
Make sure nobody is standing right next to the device as this could affect the measurement. Keep at least 1m away from the device while it is measuring.
4. Analyse the results and download reports
The growth tracker results can be analysed either on the platform, or by exporting a pdf-report. The Growth Tracker result page is an interactive page with detailed information about growth, maturity, and growth-related injury risk. The Growth Tracker group report is developed as a summary for trainers and coaches. It shows a page with the essentials in function of bio-banding, and another page in function of injury prevention. Finally, results can also be shared with the athletes and/or parents by sending them the individual report card. This card shows a summary of the results together with a brief interpretation.
4.1. Growth Tracker results page
To analyse the Growth Tracker results, go to the ‘Growth Tracker’ tab in the black ribbon and select the group for which you want to see the results.
How to use and interpret these results:
- If your data is older than 10 weeks, it will show a (!) symbol and the results will be greyed out
- You can reorder the athletes based on the values in each column by clicking on the arrows in the header
- The growth tracker estimation method is by default on ‘Khamis Roche’. Currently this is also the only adult height estimation method supported in the Growth Tracker, but new methods will be added in the future.
- Using the ‘meatballs’ in the upper right corner, you can click on ‘Set column visibility’ to (de)select which columns are visible in the results page.
- You can click on the data of ‘body height’, ‘Growth Velocity’, ‘body weight’, and ‘weight velocity’ to see a graph of the evolution of these results
- Clicking on ‘% Pred. Ad. Height’ will show a figure indicating the maturity status of the athlete
- If you wish to analyse the results of multiple groups together, you can create a new group (e.g. U15 & U17) and add the athletes of both groups in this group.
4.2. Export the Growth Tracker pdf for injury prevention and bio-banding
We recommend to only give access to the Hylyght platform to one or two people within each organisation. After every measuring session, these people can then send the group reports as a pdf the trainers and coaches. This facilitates correct use of the Growth Tracker.
To download these group reports:
- Go to the Growth Tracker page
- Click on the ‘meatballs’
- Select ‘Download group report’

The first page (Growth related injury risk) summarizes the results in function of avoiding growth related injuries, while the second page (Maturation) summarizes results in function of bio-banding.

For more information on how to interpret these reports, see How to interpret the Growth Tracker results
4.3. Download or e-mail the individual reports
To download the individual reports in bulk:
- Go to the Growth Tracker page and click on the ‘meatballs’
- Select ‘Download all individual reports (zip-file)’
- A pop-up will appear saying ‘Zip download is sent to your mailbox’
- Within a couple of minutes, the e-mail address with which you are logged-in will receive an e-mail from , containing a zip-file to download all the individual reports of the athletes in this group.
In case you want to e-mail the reports directly to the athletes:
- Go to the Growth Tracker page and click on the ‘meatballs’
- Select ‘Mail all individual reports’
- A pop-up will appear asking “Are you sure you want to send this report? Every athlete with a known mail address will receive their own report”
- Click ‘OK’ if you indeed intend to e-mail the reports to the athletes.
- You will see a confirmation message ‘Individual report is sent to each person’
Note that each athlete will receive only his/her report, not those of other athletes. Notify the athletes or their parents when they can expect the report from ‘info@hylyght.com’ so it is not mistaken as advertisement or spam.

Note that only the athletes for whom the e-mail address was added to their Hylyght profile will receive an e-mail. To see an overview of who has their email address attached, go to the tab ‘athletes’ and select the group you want to inspect. Athletes with an ‘envelop’ (1) next to their name have an e-mail address attached, the others do not. To add an e-mail address to an existing profile, go to the tab ‘global’ (2) and click on the ‘pen’ symbol (3). Add the e-mail address and click ‘save’.

5. FAQ
5.1. What if height of parents is not known
As we currently use the Khamis-Roche method to estimate adult height, we need the height of both parents. If this is not known for one or both of the parents, you could use the average height of a man/woman in your region. The adult height estimation will not be accurate, but you will still get a (rough) estimate of maturity timing.
If height and weight of one or both of the parents is not filled in, you could still follow-up on height velocity.
We are currently looking into adding other methods to estimate adult height. Ideally, those who lack information on the stature of one of their parents can then switch to another method.
5.2. What if an athlete misses a test session?
No problem, you can test the athlete on another date. Keep in mind that the date of the test session is used to calculate growth velocity. So it’s best to make a new test session to test the athletes who missed the previous session. With the automated system, the moment of the measurement is saved. So you can (re-)test athletes at any moment.
5.3. Can I use both automated testing and manually collected data?
Yes. Both ways of measuring can be combined. You can find all collected data of an athlete under athlete > Global > input data
5.4. What thresholds are used to determine if an athlete is growing ‘too fast’?
A ‘safe’ growth speed is considered to be below 6cm/year. When an athlete is growing between 6-8cm/year, a yellow warning is shown as this is a slightly increased growth velocity. Above 8cm/year, a red warning is shown as this indicates that the athlete is growing at hight speed, and therefore is more likely to get growth related injuries.
5.5. How should I adjust the training program of quickly growing athlete?
Overall, the goal is to reduce training load, and to increase load capacity.
Reducing training load can be done by:
- Reduce the number of training hours and/or games
- Avoid long repetitive intensive activities (e.g. jumping)
- Train on cushioned surfaces instead of on a hard surface
- Focus less on physical development, but more on technical and tactical aspects
Increasing load capacity can be achieved through:
- Adding exercises for balance, mobility, and core stability to the trainings
- Focus on coordination rather than physical performance
- Include sport specific injury prevention exercises in the warm-up and/or cool-down
⤶ Back to the Growth Knowledge Base